My original Hackintosh is still up and running. The big problem is that it is stuck at OS X 10.11.6 (El Capitan) along with my real Apple products (Mac Mini circa 2009 and Mac Book Pro from late 2007). So that’s been almost 5 years since 10.11.6 was released. And it has been 4 and a half years since OS X 11.12 (Sierra) was released. In order to make it to OS X 10.15 and beyond I figured I would build one more Hackintosh. Which will mostly likely be my last one due to Apple moving to ARM chips. The Hackintosh is effectively dead.
My first Hackintosh had the following components:
CPU: i5-3570K (Ivy Bridge 1155 socket)
Memory: DDR3 1600 – 20GB Total
Graphics: NVIDIA GeForce GTX 650 2048MB
Motherboard: QUO Z77MX-QUO-AOS (made by Gigabyte)
The motherboard was from QUO Computer’s projectQ Kickstarter from 2013. There was a lot of bad blood over this Kickstarter. I backed “THE CONNECTED BY DEMAND” pledge level for $289. While I got my board, they failed to include the wifi/bluetooth card with it. No t-shirt either. From the comments section on the Kickstarter, I saw that I wasn’t the only that didn’t receive the wifi/bluetooth card. Also some of the boards were never delivered. The big losers were the people who backed at the complete systems level which were the most under delivered rewards. A number of people lost a good bit of money (up to $2500USD) backing the project.
I plan on making a ProxMox Box out of my original Hackintosh system components. I will upgrade the video card to GTX 950 I have available. The website TonyMacX86 was the place that I visited to research while building my original Hackintosh. Looking at the Buyer’s Guide Section I was able to choose the components that would increase my chances of success. The Installation Guide section provided the information that helped me to successfully create my original Hackintosh using Clover as the bootloader.
Once again I consulted with TonyMacX86 and looked at their Buyer’s Guide Section to pick out the components that I would be using. The following components are going into my second build:
Motherboard: Gigabyte Z390 M Gaming – MicroATX LGA 1151
CPU: Intel Core i9-9900K (Coffee Lake)
Fan Cooler: Noctua NH-D15 Graphics: Sapphire Radeon Pulse RX 580 8GB GDDR5
Memory: DDR4 3200MHz CL16 SDRAM (1 stick of 32GB) Case Fans: Noctua NF-P14
SSD: WD_Black SN750 500GB NVMe
Case: AZZA – CSAZ-310DH
Wifi/Bluetooth Card: Fenvi FV-T919 (Suitable for Hackintosh)
For the boot-loader on this second build I went with OpenCore instead of using Clover. This time I did not use the TonyMacX86 website for build instructions. They do have info on using OpenCore, but I turned to YouTube for my build instructions this time. There were quite a few videos available. The video that I went with is from the Chris Titus Tech channel. The particular video is called “Install macOS on any PC | OpenCore Guide”. He uses a Linux Mint Live (LML) system to create the boot USB. I happened to have a portable drive with Ventoy and a LML system was one of the systems available on it. I mentioned Ventoy before in my post on WinPE. For the most part the video is pretty good. He had to install Python on his LML system, but I already had Python3 on mine. The SSDDTTime.py script he used was older that the version that I downloaded. There were only 4 options on the menu while the newer version had 8 options. It was easy enough to figure out. The ProperTree.command (python) script worked well.
I was finally able to successfully boot up into the OS X install. It took me a while to figure out my problems. Probably the biggest issue I had was that I needed to adjust some Bios settings. Here is a list that I followed. I couldn’t find all of these settings in my Bios, but I did set the majority of them.
Disable
Fast Boot
VT-d (can be enabled if you set DisableIoMapper to Yes/TRUE)
CSM
Intel SGX
Intel Platform Trust
Enable
VT-x
Above 4G decoding
Hyper-Threading
Execute Disable Bit
EHCI/XHCI Hand-off
OS type. (Windows 10 Features Other)
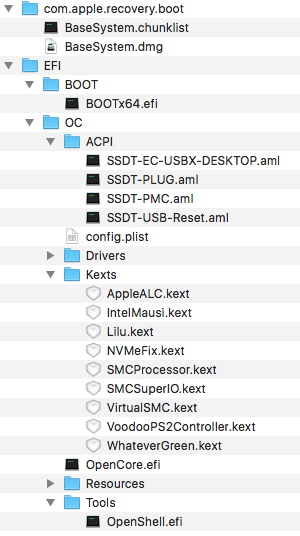
When I finished, the files in my OpenCore USB boot looked like this:

After I booted up into the installer, I had to format my NVMe drive. Since I was installing OS X 11.15 on it, I was forced to use APFS (I choose Case Sensitive). Following the steps in the video, I moved the EFI folder on my USB boot to my NVMe drive.history.
There are two ways you can move the EFI folder on your USB boot drive to your new drive.
1. get and use the MountEFI script that is mentioned in the video:
$ chmod +x MountEFI.command
$ ./MountEFI.command
Follow the steps in the video for using the MountEFI script.
2. Or you can use these commands in the terminal:
$ diskutil list
$ sudo mkdir /Volumes/EFI
$ sudo mount – t msdos /dev/disk0s1 /Volumes/EFI
$ cp ./OPENCORE/EFI /Volumes/EFI
While I wanted to use Migration Assistance to move my files from my original Hackintosh to my new Hackintosh, I couldn’t use it. The reason is that my original drive is not APFS while the new drive is. So I am not allowed to migrate the files. Trying out EaseUS ToDo Back for the Mac. I made a backup of a number of folders on my original Hackintosh. I restored those backed up folders to my new Hackintosh one folder at a time, starting with the Applications folder. Then I did the rest that I had backed up. My Thunderbird application started up and all of my mail was there. Firefox had all of my settings and so did the majority of the other applications. There were a number of applications that I had to update in order for them to run under OS X 10.15.
The last thing I needed to do was to check on the Fenvi FV-T919 wifi/bluetooth card to see if it was working properly. I already knew that the wifi was working, but I hadn’t check on its bluetooth capability. Well bluetooth wasn’t working. I was sure that I plugged in the cable from the Fenvi to the onboard usb so the BT should work. Well I looked in the computer through its glass side panel and it seemed that I did not plug in the cable. 🙁 After shutting down the computer, I removed the side cover so I could plug in the cable. I reinstalled the side cover and started the computer up. The Bluetooth was working finally. The FV-T919 works in my hackintosh without needing any drivers as promised.
Next thing on my list is to overclock the CPU. I will save that for another post.